
Before I go to sleep and forget everything I wanted to pen down the full notes and pointers provided by Aetas during our 1-1 Live2D learn-to-rig stream! Aetas was such an amazing teacher and held my hand throughout, helping me spot common mistakes and correcting me whenever I took a wrong turn. With her watchful eye and clear instructions, we managed to achieve applying head angles, 3D turn, clipping shadows and a simple blink animation! A lot in 2 hours if you asked me, but it was a very fruitful process, so I wanted to record as much of it as possible. I hope you found it helpful!
You can download the file to practice along ^_^ Please abide by the Terms of use in the first layer.
Full stream:
I will try to recall the steps as much as possible!
1. Model splitting
I have never made a Live2D model from scratch, but having commissioned many models over the years and applying tweaks to some of them myself, I was somewhat familiar with the layering process. For this Live2D model, I flattened most of the layers for convenience sake and kept the eyes to simple ovals.
I watched this video by Jueri Hann Ch. to recap some things on layering for rigging:
*spaces are not allowed, underscores are.
*You can use a full fill for lineart (a full shape behind your colour layer)
*Naming is according to the character’s Left and character’s Right. So when we see the labelling, it is mirrored to ‘Left’ on the right side and ‘Right’ is on the left side (confusing, right?)
*I distinguished my left and right layers with L_(part) or R_(part)
*Live2D only supports Multiply and Add layer styles. Other layer styles will not register.
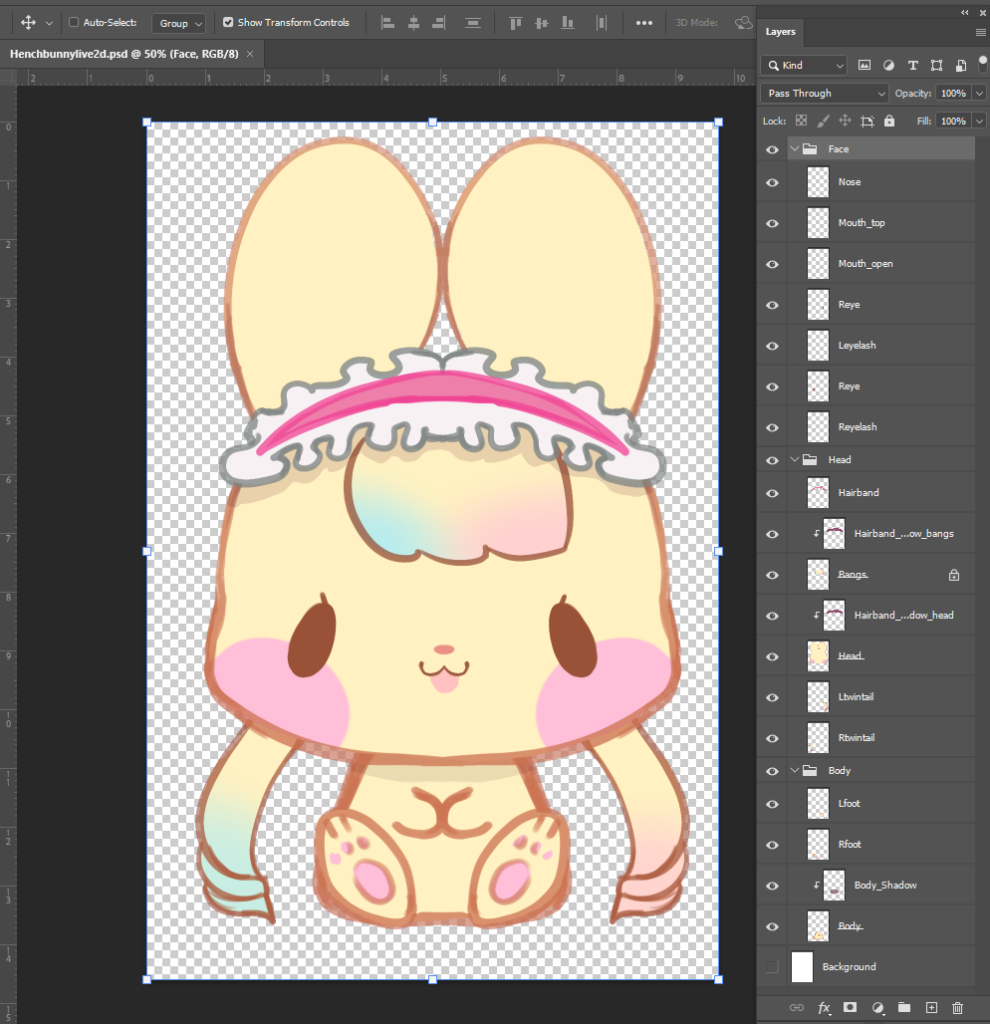
I asked Aetas to take a look at the model beforehand, and she gave me some pointers on improving the file before we began.
Before
Aetas gave amazing direction and clear instructions on what to do with the file. It was a very smooth process though I was applying the changes up until the last minute, since I was streaming Chicory at the time and only had about 15 minutes to put together the steps during my short breaktime XD Still, we pulled through!
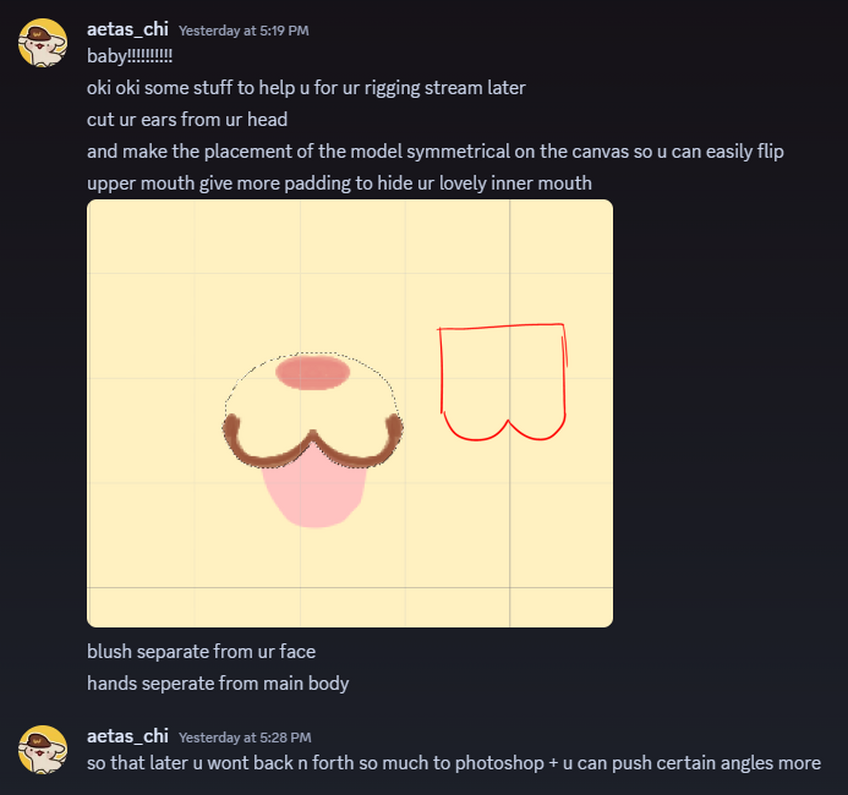
After
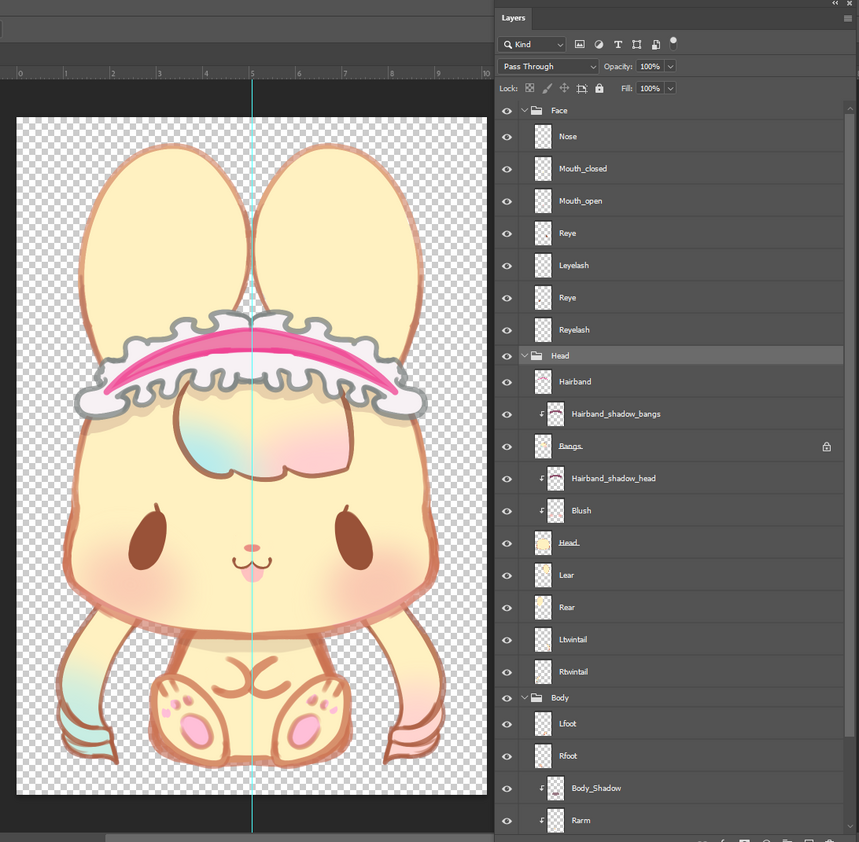
2. Beginning and importing
I downloaded Live2D cubism from the official site and activated the trial Pro period just a little earlier today. We ran into some little issues using different versions of the software, but they were mostly understandable differences, like some controls being called ‘flip’ on one version and ‘reflect’ on another. One thing that was a little annoying was the default selection being individual mesh points rather than the whole thing though, but we hadn’t found a way to reset that default.
In any case, with Live2D opened, we dragged the revised file in to start!
*We didn’t notice until later, but I had two layers called “Reye” or “Right eye”. We fixed it later. I also added underscores to make the layers more readable. I’ve uploaded the file if anyone wants to use it for practice! If you use it, please show me how it looks with your rigging!
3. Meshing
Meshing was not too difficult in Live 2D! Essentially, you need to make a mesh for every art layer in order to add parameters to the parts. If you’ve used warp or puppet warp in any way, it seems to work similarly.
Live2D comes with useful tools for meshing. At this step, I used the pen mesh tool (left), auto mesh tool (right), and selection arrow the most (circled in Fushsia). Using pen mesh and auto mesh comes with their own tool details when active.
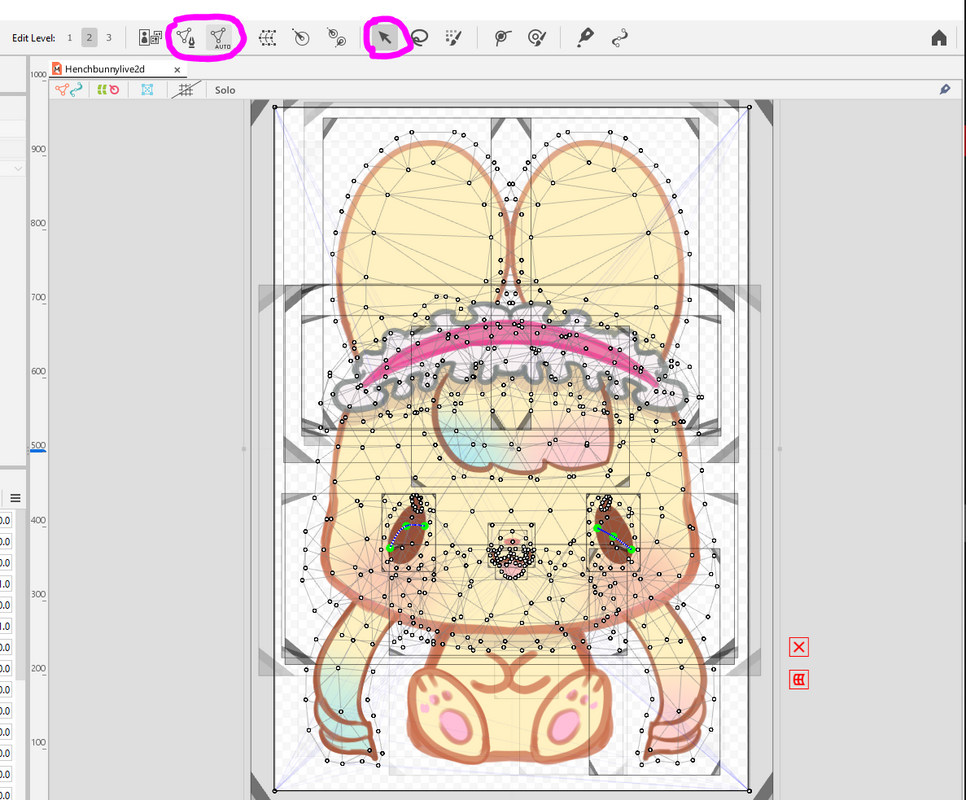
Pen Mesh
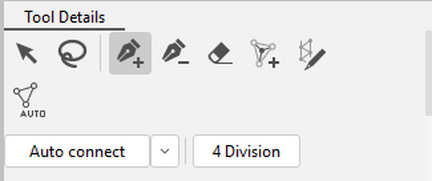
I used the Pen mesh for parts that were more detailed. There is also a stroke mesh mapping tool which allows you to trace over lineart or enclose shapes to create a simple mesh. Meshing the lineart can prevent odd warping.
Most of the time, you will need to adjust the mesh with the selection (Arrow) tool. You can also use basic photoshop selection and copy-paste functions with a mesh. Selection is also used to amend or delete any unwanted mesh points.
**Something that happened a few times was that the mesh included an outline of the whole canvas. When that happens, you need to delete the extra mesh points. Similarly, some parts do not need mesh parts in between, and they can be removed by selecting then deleting them.
Auto Mesh
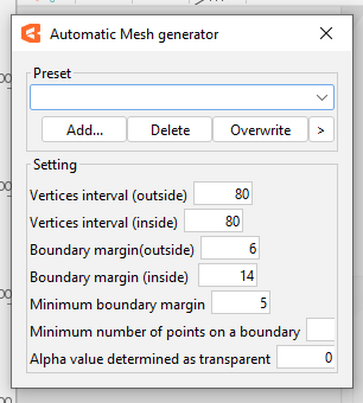
I used the Automatic Mesh tool for parts that were a little bigger and more predictably geometric. It worked great for many of the round parts! Playing with the vertices also allowed me to tighten or broaden the meshes easily.
Presets are also an option if you work with similar shapes often. But since it is my first rig, I do not have any familiar forms to apply.
Meshing – Symmetry
Symmetrical meshing was quite easy. Select all the mesh points using the arrow tool that you want to copy over. Copy (ctrl+c), select the layer it is to be copied to, then paste (ctrl+v). You can right click the points while selected to Flip or Reflect directly.
4. Warp Deformers
Next, we had to create warp deformers! This step is similar to creating new layers in after effects to animate individual parts. The warp deformers come with presets that make it possible to set parameters with.
I created 3 individual warp deformers for every layer. I’m sure there might be a quicker way to perform this process that I’ve yet to discover, but the steps were simple to follow.
Click on the part > Create warp deformer > Rename Layer > close.
Repeat for every part. I followed Aetas’ instructions and created an ‘XY’, ‘Z’ and ‘physics’ layer for each part.
I created warp deformers for all the Left side parts and did not create any for the right side, since it is a symmetrical model. (We can copy the physics over later!)
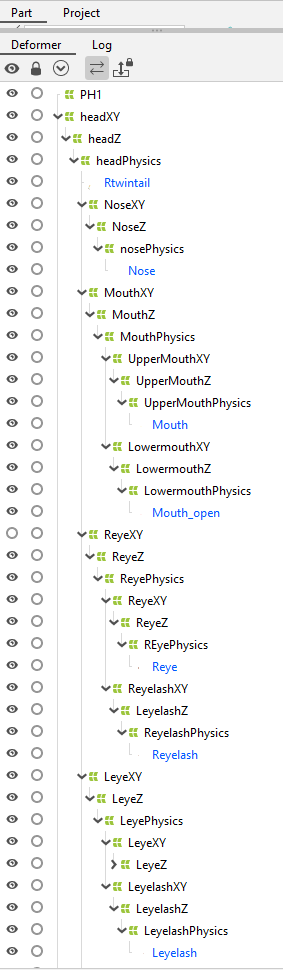
5. Grouping Layers (‘Parenting’)
The layer grouping was a little confusing to me and looked vaguely like a string of code. Drag the “XY” of the parts that belong to the head into the parent “XY” layer. This groups them to move together with said part (to be child to or pinned to).
We did that first and put all the parts belonging to the face and that would be attached to the head into “HeadXY”, including the shadow. That way, all the parts should move together. like so:
A few times, I was not dragging the layers to the right place, so I have to be mindful to select and drag them correctly. Thankfully, the parenting system is quite forgiving and you can move things around easily.
The first layer, PH1, is short for Placeholder 1, which is a layer we used to duplicate and flip/reflect physics symmetrically later on.
6. Head XY
For the head XY, we get into Parameters.
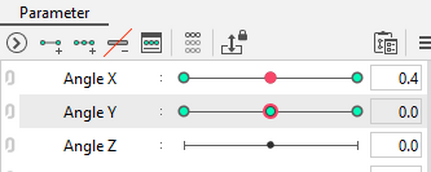
Select the XY layer of the part you want to move, and click on add 3 keyframes (2nd button in the toolbar). Then, click the corresponding keyframe and move the head accordingly. I held down shift to move it while holding the horizontal plane.
X: -30.0 = Left, 0.0 = Middle/Default, 30.0 = Right
Y: -30.0 = Down, 0.0 = Middle/Default, 30.0 = Up
After setting the parameters of the X and Y, you can click the hamburger menu > Synthesize corners. Live2D Cubism will generate the corner movement for you.
If you want to visualise the movement more easily, you can click the link layers option to make it a grid and move the head to test the parameters. We did not do Angle Z. (forward/backward or closer/farther)
7. Face and ears following the head
Any parts in the Head group would already be moving with the head, but to achieve the 3D effect, some tweaks need to be made to the parameters. The main tweaks to them were:
Ears: Foreshortening during turning, looks shorter when bunny looks up, looks longer when bunny looks down, and might shorten at the edges when looking side to side.
Eyes: Eye moves inwards as the character turns head left to right.
I did not tweak much to the nose and mouth, but I will see if I can learn them in the future!
Once the head/face angles were put in, it looked like this:

Physics Symmetry
When copying physics over, It’s wise to rename all the layers to prevent confusion, but since it was a quick lesson I did not do it at the time. As of writing this, I made sure to rename them.
To copy physics, you need to first create a placeholder warp deformer. The placeholder deformer should be the size of the model or canvas to make flipping easy.
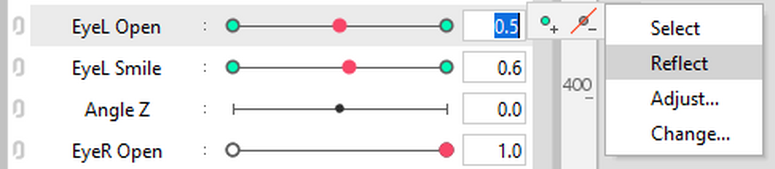
Then, click on the XY layer of the part you want to copy. In my case, I wanted to copy the Left eye to the right, so I selected LEyeXY, and right click > Select child objects. This should select everything that is in that group, including parameters and physics. Ctrl + C, select the placeholder warp deformer, and Ctrl + V. While everything is still selected, flip/reflect, then rename the layers and put them back in its parenting group. That should reflect all the physics, but if the physics needs to be reflected, it can be done easily from the keyframe dropdown menu:

8. Shadows
We only noticed the shadows weren’t clipped a little later into the rig, but typically clipping layers will occur at the parenting stage (I think.)
To clip layers, you need to input the layer ID into Clipping ID in Inspector. You can click a mesh and Ctrl+C to copy the layer ID. For example. the hairband shadow is clipped to the Head layer.

9. Blinking + Eye smile
Finally, we added blinking! For the blink animation, we added 2 keyframes in the Eye Open parameter. 0.0 = Eye is closed. 1.0 = Eye is open. We squished the eye mesh while at 0.0 (like using Transform in Photoshop) to create the illusion of a closed eye. This process will be very different with anime style eyes, but that is something we can learn down the line.
We also had to move the eyelash along with the eye, so we added 2 keyframes for that and dragged it from open to closed position. It should move together during blinking.
We added an eye smile as well, using the ‘Deform Path Edit’ (P) tool (4th from the right on the topmost toolbar) while the eye was closed, to add a more smiley eye shape when eye smile is triggered.
10. Saving
Saving the file was simple, we should have saved from the beginning and on the way, but we got too engrossed in rigging. Thankfully no crashes occured and we were able to save successfully at the end. File > Save As, and save it to your folder of choice. Once the initial save is created, you can Ctrl+S to save quickly in the future.
Useful tips:
To reset all values, click the hamburger menu in Parameter > Reset to Default Values
—-
This post was created more for my own reference in the future, but I hope it helped if anyone views it! Big thanks again to Aetas, her commissions are open as of publishing these notes, so please support her if you enjoy her rigs! I’m looking forward to learning more about Live2D~ ^_^